
My daughter came home from a sleepover last month raving about this amazing pie her friend’s mom had made. She couldn’t stop talking about how it tasted exactly like a Butterfinger candy bar but in creamy pie form.
I knew I had to figure out how to make it because she kept asking when we could have it at our house. After a little experimenting, I nailed it with this no-bake version that’s honestly easier than I expected.
The first time I served it, my husband took one bite and said it was better than any restaurant dessert he’d ever had. Now it’s become our go-to dessert when we want something that looks fancy but doesn’t require any actual baking skills.
My daughter’s friends now come over specifically asking if I’m making “that Butterfinger pie again.” I guess the word got out pretty quickly in her friend group.
Why You’ll Love This Recipe
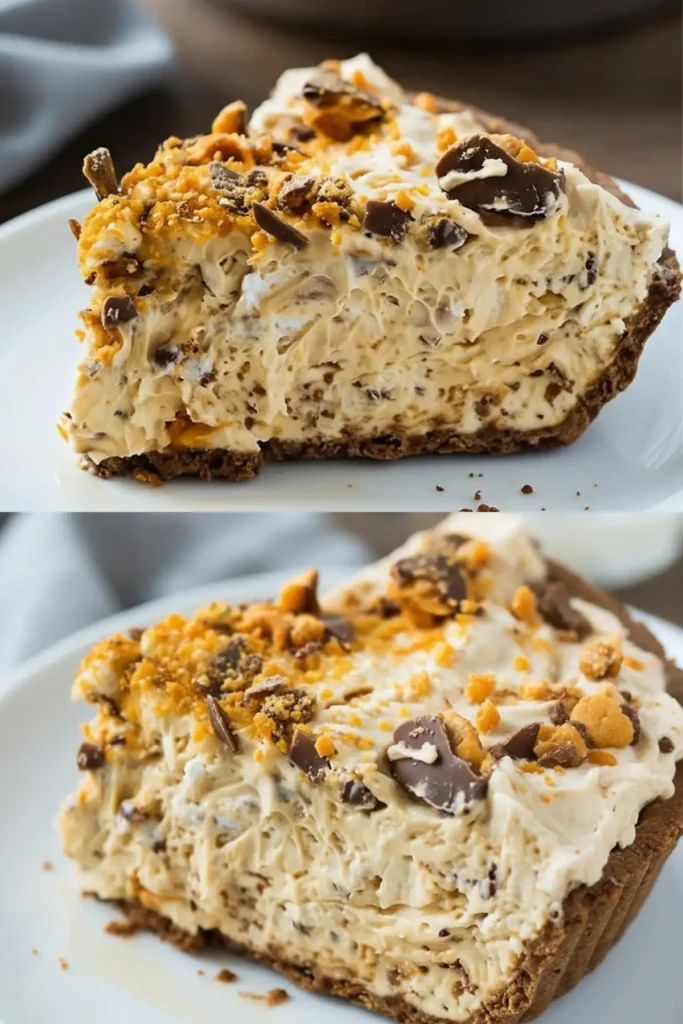
It tastes exactly like eating a Butterfinger candy bar, but in the most luxurious, creamy pie form you can imagine. The texture is absolutely perfect.
The ingredients are simple and you can find everything at any regular grocery store. No hunting down specialty ingredients or making trips to multiple stores.
It looks incredibly impressive when you serve it, but the hardest part is waiting for it to chill.
Kids and adults both go crazy for this pie. It’s one of those desserts that appeals to everyone, no matter what their usual preferences are.
Recipe Tips for Success
Crush your Butterfinger bars while they’re still cold from the fridge. They break up much cleaner and you get better pieces instead of a sticky mess.
Use a plastic bag and rolling pin to crush the candy bars. This contains the mess and gives you more control over the size of the pieces.
Save some of the nicest crushed pieces for the top garnish. The broken bits on top make it look so much more professional.
Let the pie sit at room temperature for 5 minutes before slicing. This makes it easier to cut clean slices without the filling sticking to your knife.
What You’ll Need
1 (8-ounce) package cream cheese, room temperature
1/2 cup creamy peanut butter
2 teaspoons vanilla extract
1 1/2 cups powdered sugar
1 (12.5-ounce) bag fun-sized Butterfinger bars, crushed (reserve 2 bars for topping)
1 (8-ounce) container Cool Whip, thawed
1 store-bought Oreo or chocolate graham cracker crust
Step by Step Instructions
1. Prepare the base
In a large mixing bowl, add the room temperature cream cheese and creamy peanut butter. Using an electric mixer, beat on medium speed until completely smooth and creamy.
2. Add vanilla
Add the vanilla extract and continue beating until it’s fully incorporated into the mixture.
3. Mix in powdered sugar
Gradually beat in the powdered sugar, starting on low speed to prevent a sugar cloud, then increasing to medium until the filling is perfectly smooth.
4. Fold in Butterfinger pieces
Gently fold in the crushed Butterfinger bars (save 2 bars worth for the top) until they’re evenly distributed throughout the mixture.
5. Add Cool Whip
Carefully fold in the thawed Cool Whip, mixing just until incorporated. Don’t overmix or you’ll lose the light, fluffy texture.
6. Fill the crust
Spread the filling evenly into your prepared crust, smoothing the top with a spatula.
7. Top and chill
Sprinkle the reserved crushed Butterfinger bars on top for decoration and extra crunch. Refrigerate for at least 4 hours before serving.
Variations to Try
Make individual servings in mason jars or small glasses for a cute presentation at parties. Just layer the filling and crushed candy.
Try using a peanut butter cookie crust instead of chocolate for even more peanut butter flavor throughout.
Add a drizzle of melted chocolate over the top before serving for an extra decadent touch.
Substitute other peanut butter candy bars like Baby Ruth or Snickers for completely different but equally delicious flavors.
Make it even more indulgent by adding a layer of hot fudge in the bottom of the crust before adding the filling.
Serving Suggestions
This pie is rich, so smaller slices are usually perfect. A little goes a long way with all that peanut butter and candy.
Serve it with a glass of cold milk to balance out the sweetness, especially if you’re serving it to kids.
It pairs beautifully with fresh berries on the side to cut through some of the richness with a bit of tartness.
For special occasions, add a dollop of fresh whipped cream and an extra piece of Butterfinger on each slice.
Storage and Freezing
This pie keeps beautifully in the refrigerator for up to 5 days covered with plastic wrap or foil.
It actually freezes really well for up to 2 months. Just thaw it in the refrigerator overnight before serving, though the texture will be slightly different.
Individual slices can be wrapped and frozen separately for portion control or quick single servings.
The filling can be made a day ahead and stored covered in the refrigerator before assembling if you want to break up the work.
Make Substitutions
Can I use natural peanut butter?
Regular creamy peanut butter works best because natural peanut butter can make the texture grainy. Stick with brands like Jif or Skippy.
What if I can’t find fun-size Butterfingers?
You can use regular-sized bars and just crush them up. You’ll need about 8-10 regular bars total for the same amount.
Can I make my own whipped topping?
You can use homemade whipped cream, but Cool Whip actually holds up better and gives you that perfect no-bake pie texture.
What about a homemade crust?
A graham cracker or Oreo crust is easy to make from scratch if you prefer. Just crush the cookies and mix with melted butter.
Can I reduce the sugar?
The powdered sugar helps with the texture as well as sweetness, so reducing it might affect how the pie sets up.
Frequently Asked Questions
How do I know when it’s set enough to serve?
The filling should be firm to the touch and hold its shape when you cut into it. If it’s still too soft, give it another hour or two.
Why is my filling lumpy?
This usually means the cream cheese wasn’t at room temperature or wasn’t beaten long enough to get completely smooth before adding other ingredients.
Can I make this ahead for a party?
Absolutely! This pie is actually better when made a day ahead. The flavors develop and the texture becomes perfect.
How do I crush the Butterfingers without making a mess?
Put them in a sealed plastic bag and use a rolling pin or meat mallet. Keep them cold for cleaner crushing.
What’s the best way to cut clean slices?
Use a sharp knife dipped in warm water and wiped clean between each cut. This prevents the filling from sticking to the knife.
Can I double this recipe?
Yes! Just use two crusts or one very large pie pan. The chilling time stays the same.
Prep Time: 15 minutes | Chill Time: 4 hours minimum | Total Time: 4 hours 15 minutes | Servings: 8 | Calories: 485 per slice


