
I first saw this recipe floating around Facebook and honestly rolled my eyes. Another one of those “miracle” desserts that’s too good to be true, right? But my kids kept bugging me to try it, so I finally gave in on a rainy Saturday afternoon when I had nothing else planned.
Holy moly. These little candy bites are absolutely addictive. They’re like eating fluffy clouds of sweetness that just melt on your tongue. I made my first batch thinking it would be a fun little experiment, and by Sunday evening the entire tray was gone.
Now I keep Cool Whip and pudding mix stocked in my kitchen at all times because these disappear faster than I can make them. My sister-in-law asked for the recipe after trying them at our last family gathering, and now she makes them for her book club every month.
What Makes This Cool Whip Candy Different?
These aren’t your typical hard candies that stick to your teeth or those overly sweet gummy things the kids always want. They’re creamy, soft, and have this amazing frozen mousse texture that melts perfectly in your mouth without being too rich.
The best part is how versatile they are. You can make them any flavor you want and customize them for holidays, parties, or just because it’s Tuesday and you want something sweet. They look fancy enough for company but take absolutely no skill to make.
I’ve served these at potluck dinners, birthday parties, and even packed them in the cooler for camping trips. People always ask what bakery I got them from, and I love seeing their faces when I tell them it’s just four ingredients mixed together in my kitchen.
Recipe Tips for Success
Make sure your Cool Whip is completely thawed before you start. I usually take it out of the freezer about an hour before I plan to make these. Trust me, lumpy Cool Whip makes lumpy candy, and no amount of mixing will fix it once it’s clumpy.
Line your baking sheet with parchment paper. I learned this the hard way after my first batch stuck to the pan like glue. These will stick to anything else and you’ll spend forever trying to scrape them off with a spatula.
Start with just a tiny bit of food coloring if you’re using it. I got a little heavy-handed with red food coloring once and ended up with candy that looked like it belonged in a horror movie. You can always add more, but you can’t take it back.
Use a cookie scoop if you have one. It makes the candies more uniform and speeds up the whole process. If you don’t have one, a regular spoon works fine, just try to keep them roughly the same size so they freeze evenly.
What You’ll Need
Four simple ingredients that you probably have on hand right now. I love recipes like this because I don’t have to make a special trip to the store or hunt down weird ingredients I’ll never use again.
Cool Whip gives you that amazing creamy texture that makes these candies so special. I’ve tried making them with regular whipped cream and it just doesn’t work the same way.
Any instant pudding flavor works great. Vanilla is classic and goes with everything, chocolate makes them rich and decadent, and strawberry makes pretty pink candies that are perfect for baby showers or Valentine’s Day. I keep several different flavors in my pantry just for this recipe.
Powdered sugar helps everything set up properly and adds just the right amount of sweetness. Don’t try to substitute regular sugar – it won’t dissolve properly and you’ll end up with gritty candy.
Vanilla extract makes the flavor pop even more. Even if you’re using vanilla pudding, don’t skip this. It really does make a difference in the final taste.
Ingredient FAQ
What’s the best pudding flavor to try first?
Honestly, they’re all good, but if you’re making these for the first time, I’d go with vanilla or chocolate. Vanilla is classic and most people like it, while chocolate feels more like a real dessert. Once you get the hang of it, try strawberry, butterscotch, or even pistachio for something different.
Can I use store brand Cool Whip?
Yes, any whipped topping works as long as it has the same consistency as name-brand Cool Whip. I’ve used generic brands and they work just fine.
Do I really need the vanilla extract?
You could skip it, but it really does make them taste better. It rounds out the flavors and makes everything taste more homemade rather than like you just mixed some boxed ingredients together.
What about sugar-free options?
Sugar-free pudding mix works great if that’s what you prefer. The texture might be slightly different but they’re still delicious. I make them this way when my diabetic aunt comes to visit and she loves them.
How to Make Cool Whip Candy – Step by Step
1. Mix everything together
In a medium bowl, combine your thawed Cool Whip, pudding mix, powdered sugar, and vanilla. I like to add the pudding mix gradually while stirring to avoid any lumps. Mix it up until it’s smooth and thick, like really thick frosting.
2. Add color if you want
If you’re making them colorful for a party or holiday, add a tiny bit of food coloring now. Start with just one drop, mix it in completely, then add more if needed. The color will get a little more vibrant as it sits, so don’t go overboard.
3. Get your pan ready
Line a baking sheet with parchment paper. Make sure it lies flat and covers the whole surface where you’ll be putting the candies. Don’t skip this step unless you want to spend your afternoon scraping stuck candy off your pan.
4. Shape the candies
Use a spoon or cookie scoop to drop little portions onto your parchment paper. I make mine about the size of a walnut, but you can make them bigger or smaller depending on what you prefer. Just try to keep them roughly the same size.
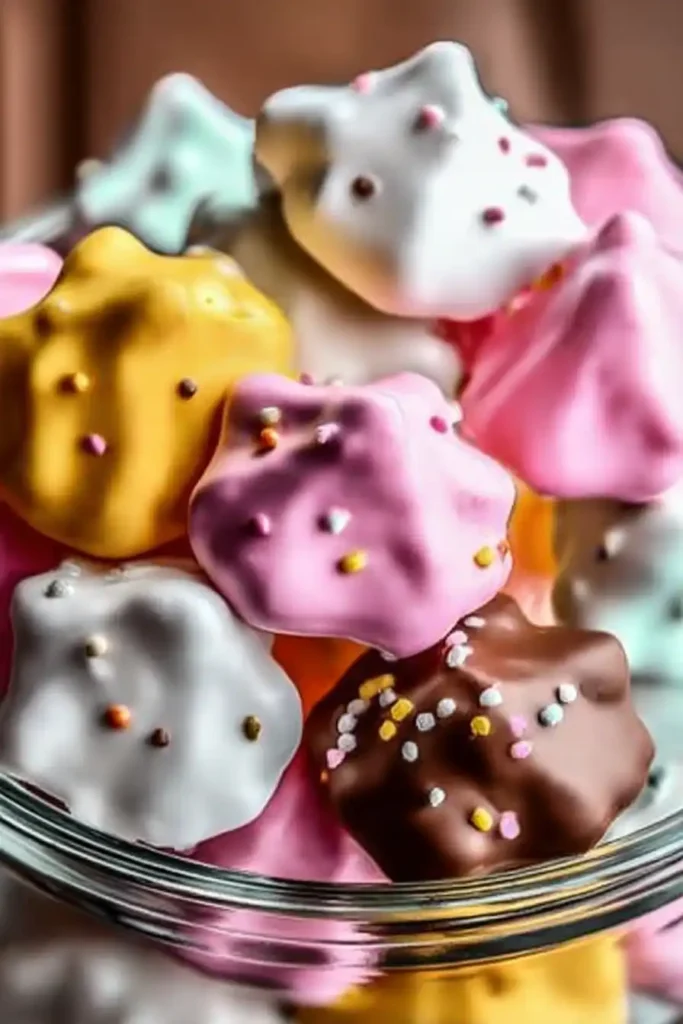
5. Add decorations
If you’re using sprinkles, colored sugar, or any other decorations, add them now while the tops are still soft. Press them down gently so they stick but don’t sink into the candy.
6. Freeze them solid
Put the whole tray in the freezer for at least 2-3 hours until they’re completely firm. I usually make them in the morning and they’re ready by dinnertime, or make them after dinner for the next day.
Variations to Try
Once you’ve mastered the basic recipe, there are so many ways to make them your own. Mix different pudding flavors together for something unique – chocolate and vanilla swirled together looks really pretty.
Add mini chocolate chips, crushed cookies, or chopped nuts before freezing for extra texture and flavor. I’ve mixed in crushed Oreos with chocolate pudding and they were incredible.
Make them festive with holiday colors and sprinkles. Red and green for Christmas, pastels for Easter, orange and black for Halloween. They’re perfect for themed parties because you can match any color scheme.
Try different extracts too. Almond extract with vanilla pudding is amazing, or coconut extract with any tropical-flavored pudding if you can find it.
Storage and Freezing
Keep these in the freezer in a covered container or zip-top bag. I like to put parchment paper between layers so they don’t stick together. They’ll stay good for about two weeks, though they’ve never lasted that long in my house.
Serve them straight from the freezer – that’s when they have the perfect texture. If they sit out at room temperature for more than 10-15 minutes, they start to get soft and lose that amazing frozen mousse texture that makes them so special.
These are perfect make-ahead treats for parties. You can make them days in advance and just pull them out when you need them.
Can I Make Substitutions?
Can I use regular whipped cream instead?
No, it won’t work the same way. Cool Whip has stabilizers that help it freeze into that perfect texture. Regular whipped cream will just get icy and weird when frozen.
What about homemade whipped cream?
Same problem as regular whipped cream. Stick with Cool Whip or another stabilized whipped topping for best results.
Can I make them dairy-free?
There are dairy-free Cool Whip alternatives available now that should work, though I haven’t tried them myself. If you do try it, let me know how it turns out!
What All Goes in Cool Whip Candy
- 1 (8-ounce) container of Cool Whip (thawed)
- 1 package (3.4 ounces) of instant pudding mix (any flavor you prefer)
- 1 cup of powdered sugar
- 1 teaspoon of vanilla extract
- Food coloring (optional)
- Sprinkles or colored sugar (optional, for decoration)
Frequently Asked Questions
How do I know when they’re done freezing?
They should feel firm when you gently press on them with your finger. If they still feel soft or squishy, give them more time. Usually takes 2-3 hours depending on how big you made them.
Can I double or triple the recipe?
Absolutely. Just make sure you have enough freezer space for all the trays. I often make double batches when I know we’re having company or for holidays when I need lots of treats.
What if my mixture seems too thin?
Add a little more powdered sugar, about a tablespoon at a time, until it thickens up to the right consistency. It should be thick enough to hold its shape when scooped.
Can I add alcohol for an adult version?
I haven’t tried this, but a small amount of liqueur might work. Just remember that alcohol doesn’t freeze solid, so it might affect the texture.


